What is close miking & why use it?
Close miking is the technique of placing a microphone close to the sound source, such as a musical instrument. However, there is more to it than that.
Often, the distance between the microphone and the sound source is shorter than the normal listening distance of that source. This may change the perception of what the source sounds like. In the case of a musical instrument, this also implies a microphone position so close that we do not get the sound of that instrument to the full extent. Sometimes this is fine because we just want to pick up characteristic sounds. In other cases, we wish for the full sonic image of the instrument.
We apply close miking to obtain the highest possible sound pressure level (SPL) of the sound source – and the lowest SPL of all other nearby or distant sources. Close miking provides the possibility of a cleaner mix and can reduce the risk of acoustic feedback when used with public address (PA) systems, as less microphone gain is required when the microphone is close.
Recording or PA?
The selection of microphones is traditionally related to the application they are used for. It is common for engineers to use one microphone type for recording and another for amplifying the same instrument. If possible, it is best to select one microphone that serves both purposes.
For recording, microphones that need little or no equalization are often preferred. It is all about the sound, the timbre and the transparency of the instrument. For PA, it is often a question of getting as much sound as possible, leaving a wide and stable feedback margin.
When the two demands meet in the same microphone, everybody is happy. But do not take it for granted.
DPA Microphones has designed a range of microphones that are equally valid for recording and reinforcement:
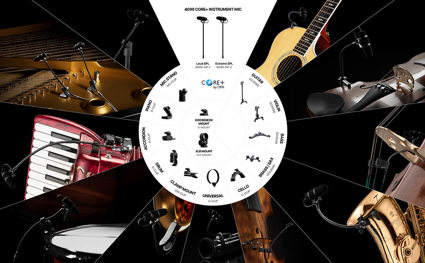
Instrument Microphones
Miniature Microphones
Recording Microphones
Listen to the sound source
Too often, microphones are selected and positioned based on experience and industry tradition. Mics are selected and placed in specific positions in front of instruments just because this is the way everyone else is doing it.
Instead, do yourself a favor: instead of bowing to tradition, listen to the instruments that require close miking. Listen with your ears close to – and move around – the individual instrument.
Then select a microphone and do the same. Listen through headphones while “sweeping” the microphone across the surface, the strings, the bell, the rim, the body of the instrument. Pick another microphone and repeat the procedure. If it is a directional microphone, check the sound by turning your microphone to both on-axis and off-axis positions.
By doing this, you will hear that each instrument has a unique sound. No two cellos, flutes, saxophones, kick drums, etc. sound the same. There may exist alternative microphone positions for each individual instrument.
It is important to balance your experience and knowledge with respect for the sound of the musicians and the instruments. Make sure to listen well and choose the best microphone and placement for the job. This will lead to the best sounding solution as well as the best working environment.
What is the sound field like?
Sound sources can be complex, especially in the near field. Some parts of a musical instrument may act like a point source. Others may act like line sources or plane sources. This is why the perceived sound – the timbre – may change a lot when moving the microphone in the near field of a musical instrument. The level of the point source drops by 6 dB per doubling of the distance. Line sources drop by 3 dB and plane sources do not drop at all. At a distance (a few meters away) the instrument eventually becomes a point source, but close-up, many theoretical models are possible. This is why it is important to listen to the instrument before attaching microphones.
In practice, it is also a question of the behavior of the sound field of more distant sources.
How loud is it?
When selecting a microphone for close miking, make sure that the microphone matches the SPL of the instrument. Is it a loud or soft sound source? Be aware that loud peaks or transients can easily reach 20 dB (10 times) above the average level.
The microphones’ dynamic range should always match the SPL of the source. If the source SPL is too high for the microphone (and the following chain), the signal will be distorted and eventually it will clip. If the source SPL is too soft for the microphone, the signal will be affected by the self-noise created from the microphone itself. DPA microphones deliver the high SPL of loud instruments, which can then clip the signal – or more likely the preamplifier, or wireless transmitter, so make sure the rest of the audio chain also handles the high SPL. There is no cure once the signal has clipped, so avoid it. If you are in doubt about how loud the sound source is, use a microphone that accepts a higher SPL.
Reflecting surfaces
One of the main purposes of close miking is to eliminate other sources. However, we sometimes forget that even reflections can act as additional, unwanted sources.
If you choose a directional microphone, point it at the primary sound source. Also ensure that the mic’s “deaf angles” are aimed at unwanted sources. However, it is of no use if the primary source (or other obstacles) reflects the sounds of the unwanted source back into the microphone as those sounds will be captured as well. This phenomenon sometimes occurs when placing microphones in front of large-body instruments or speaker cabinets.
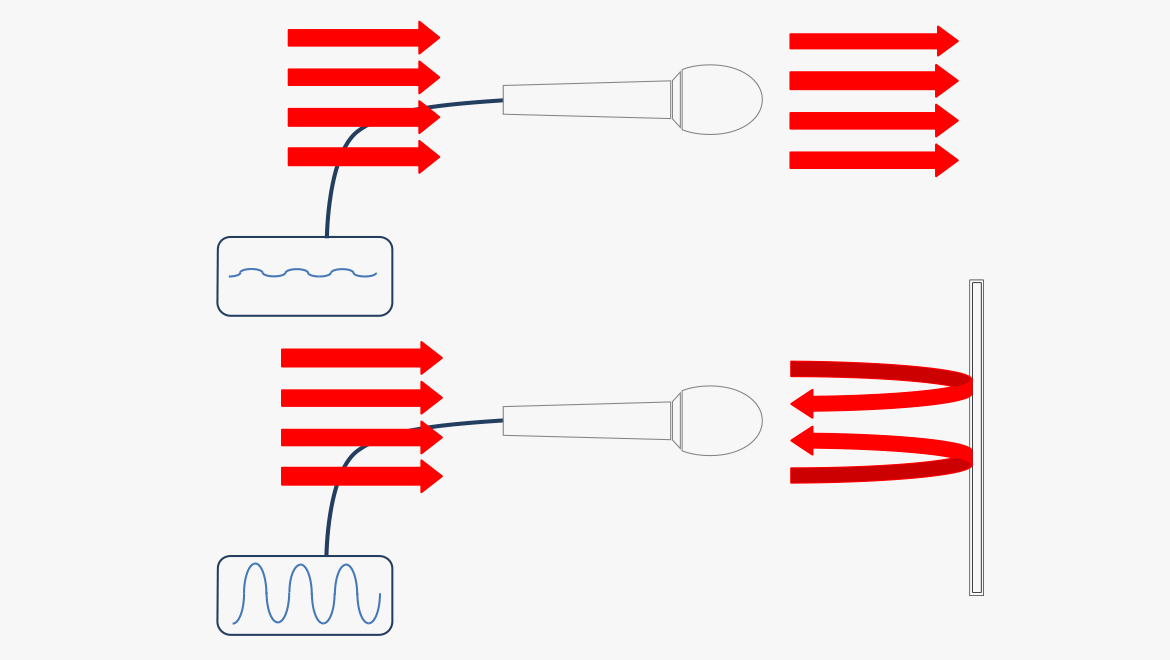
Figure 1. The microphone is oriented, so the sound source is in the “deaf” direction. However, as soon as a reflective object is placed in front of the microphone, the unwanted source is reflected into the microphone.
Also, the reflections can be a source of comb filtering, by adding the sound to itself after a small delay.
Microphone behavior – directivity
Directional microphones are supposed to accept sound on-axis and gradually reject sound as the microphone is turned, and the sound hits off axis.
However, two different brands of microphones with the same directional pattern, like two cardioids or two supercardioids may sound quite different even though the naming indicates they are quite alike.
Because off-axis sound may be an essential part of the desired sound, the microphone's off-axis smoothness is vital. When choosing a microphone, listen to the off-axis sound.
The art of balancing the sound is also the art of placing and possitioning the microphone. For instance, using a supercardioid microphone to pick up the sound of an acoustic guitar, the microphone can be placed around the 12th fret and pointed in the direction of the sound hole. Another option is to position it closer to the sound hole and point it toward the fret. There are several other positioning possibilities between these two.
Working with both on-axis and off-axis characteristics of the microphone is a part of creating the right sound for your specific situation.
Microphone behaviour – proximity
All directional microphones (pressure gradient) have proximity effect. This means that the low frequency response of the mic changes with the distance from the sound source (line- or point source). Omnidirectional microphones (pressure microphones) don’t have this effect.
A directional microphone always has a specific distance at which the bass response is flat or neutral. When you move closer to the sound source than that point, the low frequencies will increase; when you get further away, the low frequencies will decrease. The distance at which the microphone is neutral can be adjusted to suit the microphone's intended use.
This is why some recording microphones (for instance DPA's pencil mics) are designed to be used at a distance from the sound source. Other microphones (for example the d:facto™ Handheld Microphones and 4099 Instrument Microphones) are designed to pick up sound close to the sound source.
Also, the proximity effect can be used as an acoustic “low-frequency equalizer”. Getting closer = getting more low-end. Getting further away = getting less low-end.
Comb-filtering
The filtering that arises when a signal is added to itself after having been delayed in time is called a comb filter. The resulting frequency response resembles a comb, hence the name. Comb filtering is rarely intentional, but it is often heard in sound productions, where it can arise both acoustically and electrically.
Acoustically, a typical occurrence is when the sound, on its way from the source to recipient (the microphone), takes a partially direct path and a partially indirect path – via a single reflective surface. The same sound is then received by the microphone more than once with a short delay between, which creates the comb filtering.
For this delay not to affect the sound field at the microphone position, the reflection must be attenuated by at least 10 dB (reduced to one-third) and preferably 15 dB (one-fifth).
Electrically, the phenomenon arises when two microphones with a certain distance between them capture the same signal, and the level from each microphone is of the same order of magnitude.
To avoid comb filtering when placing microphones, the distance to neighboring microphones should be at least three times longer than the distance of the source to the primary microphone. It also helps if the microphones are directional and point in opposite directions.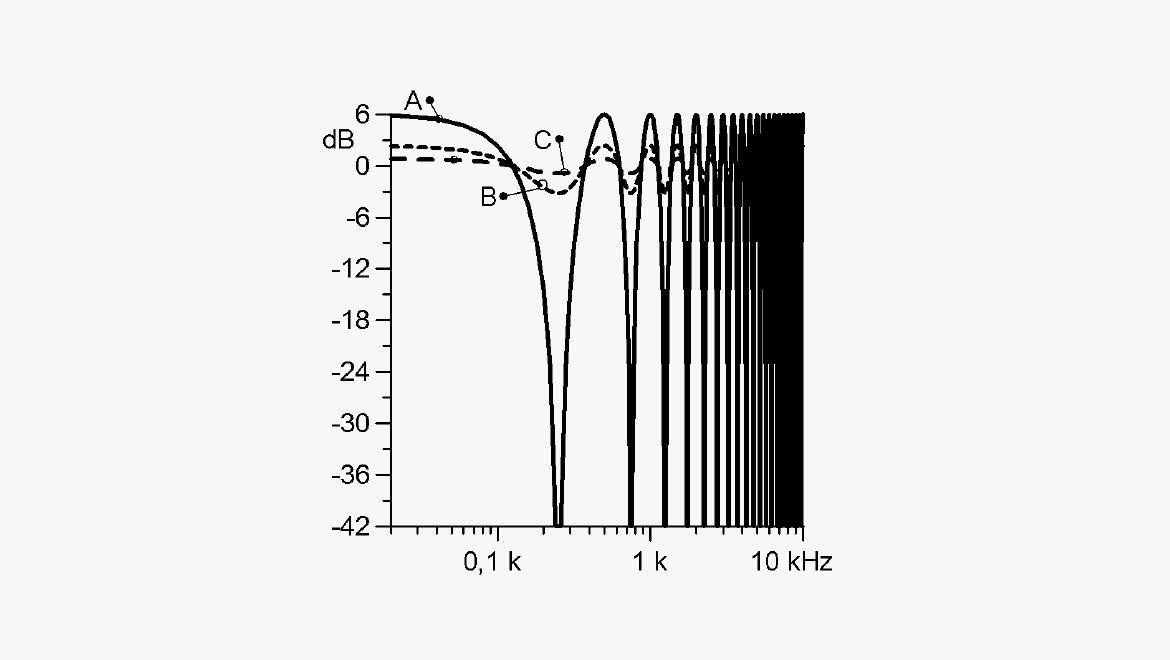
Figure 2. Three degrees of comb filtering are shown - curves A, B and C. Two signals from the same source are summed. The delay between the two signals is 2 ms. (which acoustically corresponds to a difference of path length of approximately 66 cm (26 in). The deepest cut in the frequency response (Curve A) occurs when the level of the direct signal and the delayed signal is the same. Curves B and C correspond to a level difference of 10 dB and 15 dB, respectively.
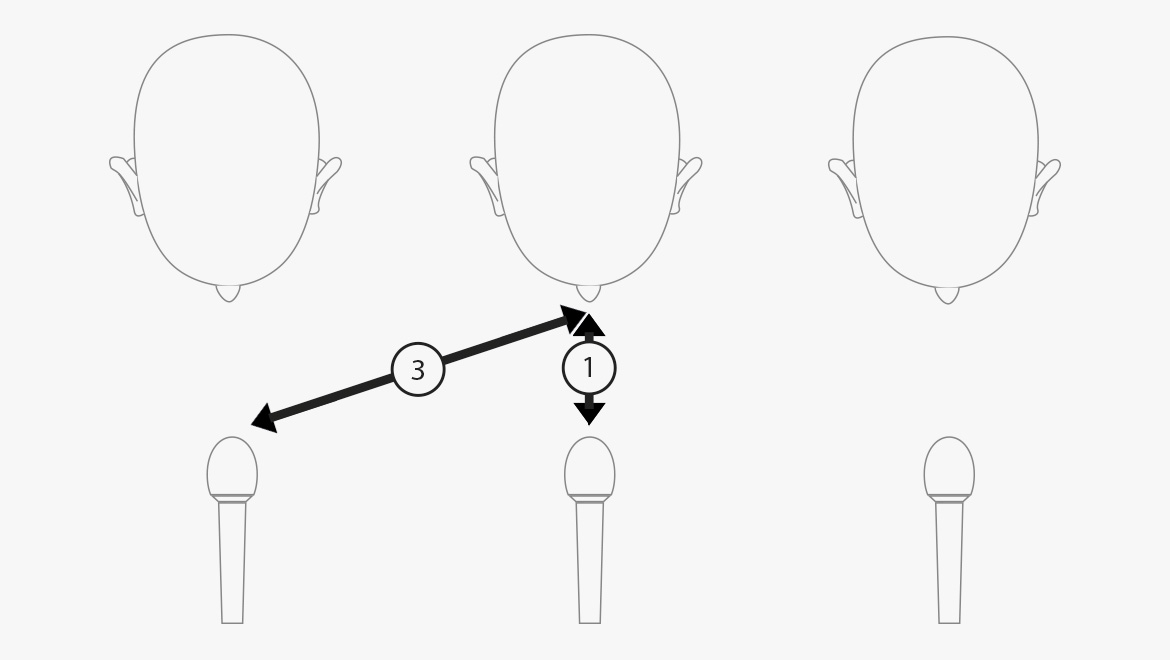
Figure 3. The 1:3 rule: The distance to neighboring microphones should be at least three times longer than the distance of the source to the primary microphone. Using directional microphones reduces secondary signals further.
Mounts / holders
Close miking often means attaching the microphone directly to the sound source. For this purpose, dedicated mounts or holders are needed. The basic requirements for these are:
- Permits optimum mic positioning
- Keeps mic secured in a fixed position
- Avoids transmission of vibrations (from handling, mechanical parts, etc.)
- Eliminates self-noise (rattling, resonances, squeaks, etc.)
- Easy, nondestructive mounting and removal
- Robust and highly durable components
- Unobtrusive, small size and light weight
- Easy storage when not in use
DPA Microphones has developed an exceptional range of fittings and holders to make mounting easy and efficient. The clip/holder range covers most acoustic instruments.