How to mic a choir
Guidelines for miking a choir with DPA Microphones.

Amplifying
In some cases, the choir is performing alongside an orchestra with a high SPL. At the same time, stage monitors may be loud, making voice clarity difficult to achieve.
Other times, the reverberation time of the venue is long. The diffuse sound is everywhere making it difficult to isolate PA speakers from the microphones.
Even background noise at the venue can be a problem. Ventilation noise can mask the choir sound and perhaps even air currents, can create wind noise in the microphones.
In addition, sometimes the right equipment is just not available. Then you must turn to the second or third best solution.
For the best sound experience, you’ll have to investigate both microphone techniques and the loudspeaker system to ensure a healthy basic setup.
Number of microphones for choir miking
The number of microphones used for the choir setup is of course defined by the size of the choir. However, it is also a question of the required amplification. The closer the choir microphone is to the source the less gain is needed.
Look at the following examples involving a twelve-person choir. These considerations are theoretical, however, they illustrate the problems well. The idea behind these calculations is inspired by an article authored by Bruce Bartlett (see references). If you want to dig into the calculations, please look at the appendix of this article..
12 singers, 12 cardioid mics: The reference for the theoretical calculation is a choir of 12 singers, singing equally loud, each with one cardioid microphone positioned on-axis and at a distance of 5 cm. The “choir output” in this situation is referred to as 0 dB.

12 singers, six cardioid mics: Two singers around each cardioid microphone at a distance of 30 cm and at an angle of 45°. We lose 17 dB of the choir output when using one microphone per two singers as opposed to one per singer. Most of this is due to the increased distance from the source – from five to 30 cm. Of course, the loss can be reduced if the singers move as close as physically possible to the microphone.

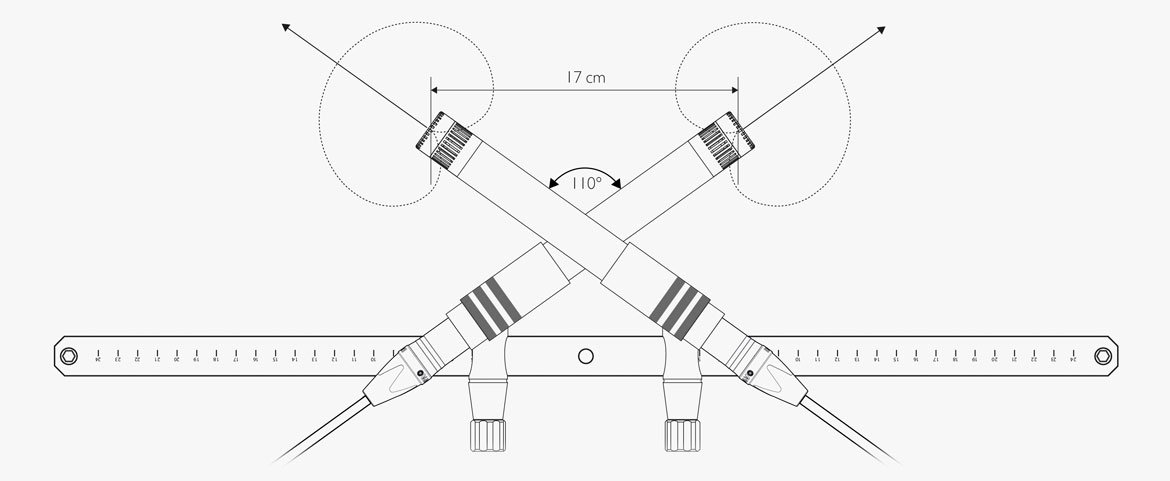
12 singers, four cardioid mics: Three singers around each cardioid microphone with the outer singers at an angle of 60° and at a distance of 50 cm. The singer in the middle is on-axis and at a distance of 67 cm. (This distance is chosen to provide the same microphone output level from all three singers). We lose 22.5 dB of the choir output when using one microphone per three singers instead of one per singer. Again: Reduce the loss by sticking the heads closely together).

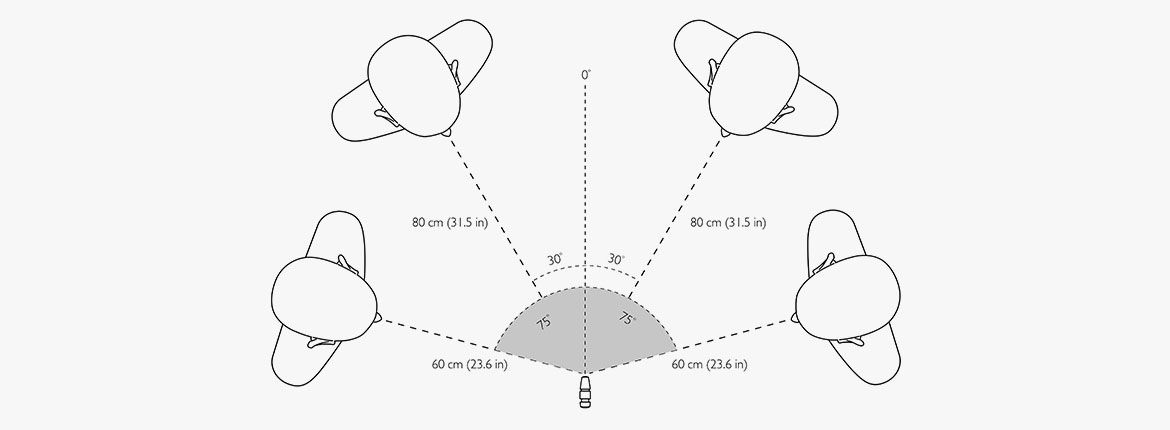
12 singers, three cardioid mics: Four singers around each cardioid microphone with the outer singers at an angle of ±75° and at a distance of 60 cm. The singers in the middle are at ±30° and at a distance of 80 cm. We lose 25.5 dB of the choir signal when using one microphone per four singers instead of one per singer. (Now it is very difficult to reduce distance with four persons around on mic).
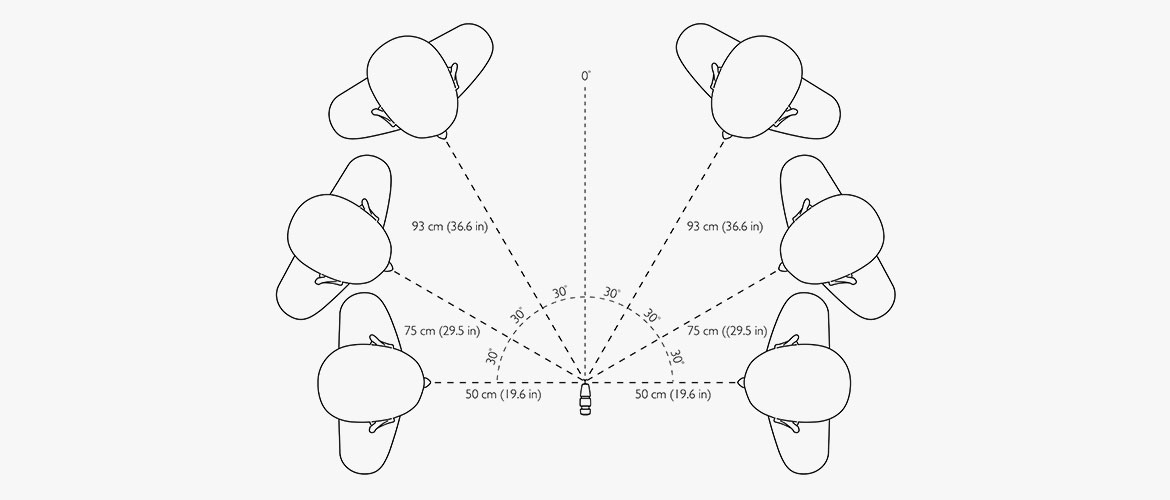
12 singers, two cardioid mics: Six singers around each cardioid microphone. The outer singers are at an angle of ±90° and at a distance of 50 cm. The next two singers are at an angle of ±60°and at a distance of 75 cm. The inner two singers are at ±30° and at a distance of 93 cm. We lose approximately 18 dB of the choir signal when using one microphone per six singers instead of one per singer. Now the group of singers is standing very close to each other. Please notice that the frontline singers are closer to each other than the other singers due to the microphone’s attenuation at 90°.
The conclusion is that we need a lot of gain to keep up with the output from close miking each singer.
The advantage of providing one microphone per singer is that it will work under almost all conditions. Two singers per microphone may work, especially if they are close together. However more singers per choir microphone only works if the acoustics are well controlled, and the loudspeakers are at some distance away and pointing away from the singers.
Using supercardioid vocal microphones
If you use a supercardioid vocal microphone for multiple singers, there are some minor issues to consider. First, the sensitivity is more “pulled in” on the sides. So, if the singers are more off-axis than say ±45°, they should step a little closer to the microphone, compared to the numbers given above.
Another thing to consider is the proximity effect; the phenomenon that the bass is raised when you get closer to the microphone. Alternatively, the other way around: The further away you get from the cardioid/supercardioid microphone, the less bass you get. In addition, you get less bass when you sing from the side of the microphone. The supercardioid loses more bass than the cardioid. Mostly to be considered with male singers.
Number of microphones: Overhead choir mics
Use of overhead microphones has the advantage of either being suspended from the ceiling – or on a stand that can position the microphone well above the heads of the singers in the frontline, pointing towards the singers at the back.
The task is – at the output of the mix – to make all singers sound equally loud. If the microphones are very close to a few singers and far away from others, the choir sounds like it has fewer members. Only a few voices are heard so the homogenous sound is not present.
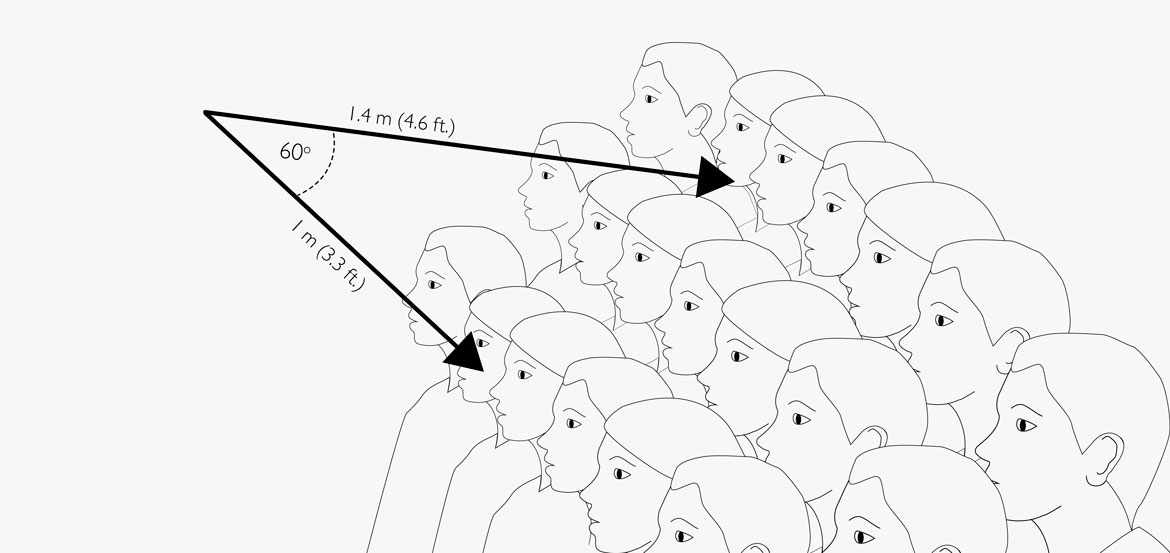
Great supercardioid microphones exhibit off-axis attenuation of approximately 3 dB at 60°. By pointing to the back, it is possible to obtain equal coverage, front to back.
The distance factor, comparing a 60° pickup to an on-axis pickup is approximately 1.4, meaning: A singer positioned on-axis can be 1.4 times further away compared to a singer positioned at 60° (for instance below the microphone).
This technique may apply to all choir setups no matter how many there are – two, three or four lines of singers:
1 Point at the singers in the back row.
2 The angle between on axis and the front row should be 60°.
3 The singers in the back row should be 1.4 times further away compared to the front row.
Choir microphones horizontal placement
The horizontal distribution of choir microphones depends on the distance to the back row. Typically, the distance between the microphones should be determined with the 3:1 rule (or the 4.5:1 rule), see below.
It depends of course on the directivity of the microphones. Highly directive choir microphones can either be placed further away from the singers or closer to each other, compared to less directive microphones. Supercardioids (or even shotguns) have narrow pickup and thus a higher directivity. Cardioids (and wide cardioids) have wider pickup and thus less directivity.
The 3:1 Rule
This rule ensure that there is minimum coloration of the sound due to phasing (comb filtering) problems. This is how to follow the rule:
When we use several microphones simultaneously, the same sound source is often picked up by more than one microphone.
In this case, the distance between the sound source and choir microphones comes in play. The rule is that a neighboring microphone should be at least three times further away, (given the sensitivity and the gain is the same on both microphones).
And why three times? Because being three times further away from a point source yields a SPL-reduction of 10 dB, when picked up by an omnidirectional microphone (20*log (1/3) ≈ -10 dB).
In a PA situation, a 10 dB reduction is sufficient, because some ofhe sound is masked by other sounds. In recording, it might be an idea to move the microphones a little further apart.
If singers’ and microphones’ directivity is taken into account, strictly spoken, the attenuation is more than 10 dB.
However, if more than two microphones are arranged in an equidistant lineup, the distance between the source and the neighboring microphones in theory should be 4.5:1 (again given the sensitivity and the gain is the same on all microphones).
In practice – and taking into account that cardioid or supercardioid microphones are applied – this means, that neighboring directional microphones should be at least three times further away and perhaps even a little more.
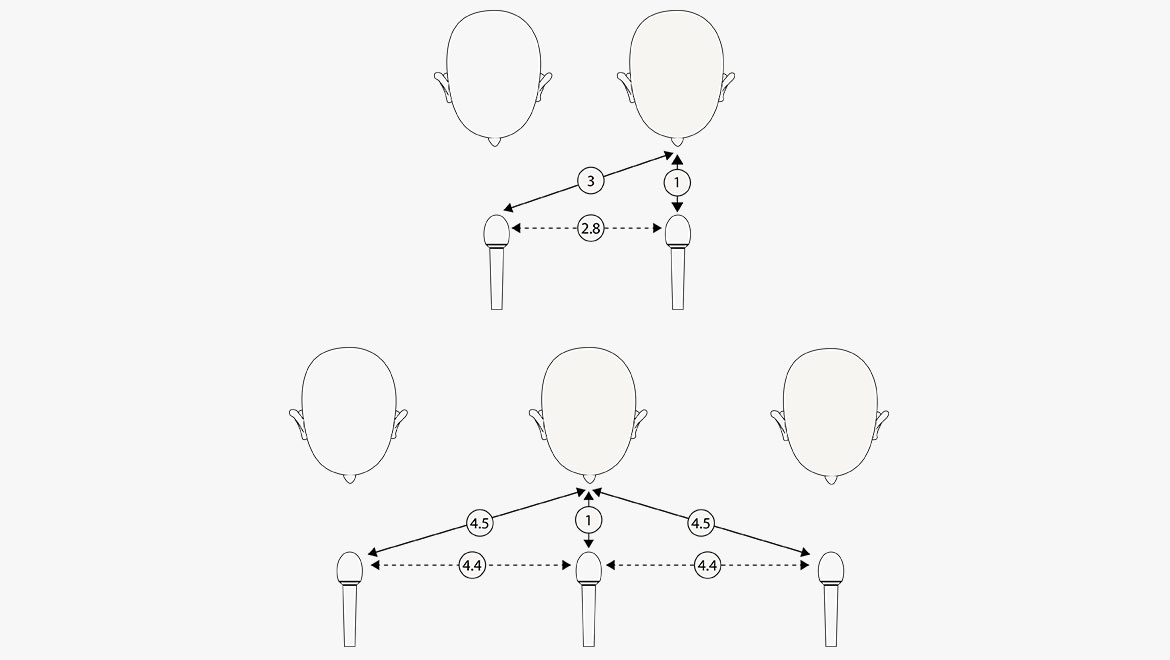
Returning to the choir examples given above. If the distance to the back row is 1.4 m (4.6 ft), the distance between the cardioid/supercardioid microphones should be at least 4.2 m (13.8 ft).
If the distance to the back row is 1.1 m (3.6 ft), the distance between the microphones should be at least 3.3 m (10.8 ft).
You can find the distances in the curves below:
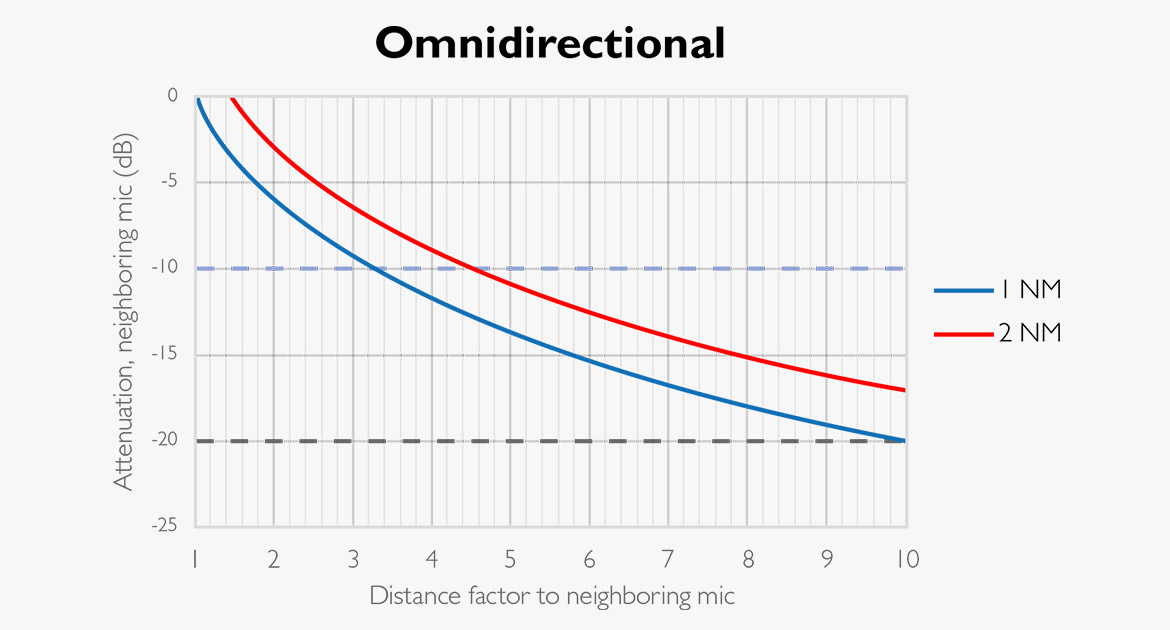
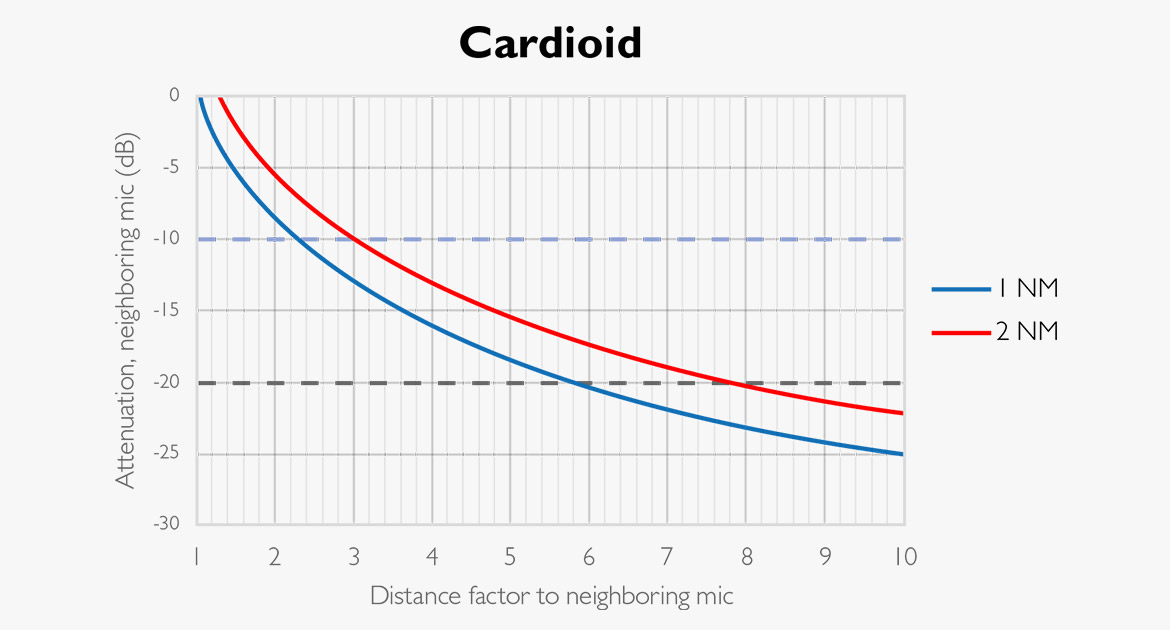
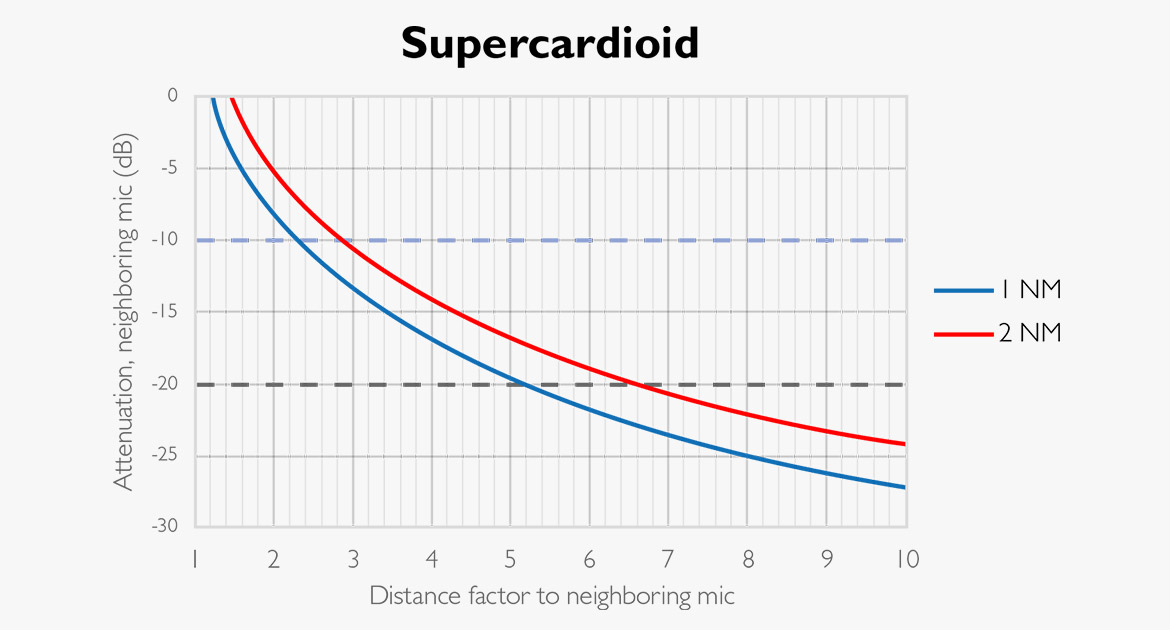
Attenuation of signal from neighboring microphones (NM), either one or two – as a function of the distance factor. Note: The distance factor has no dimension, so it works for cm, m, in, ft, etc.
Example 1:
We place two omnidirectional microphones – one primary mic and one neighboring mic
Distance factor: 3 (the neighboring microphone is 3 times further away from the sound source compared to the primary microphone, for instance 30 cm and 90 cm (1 ft and 3 ft)).
Read the 1NM (blue) curve on the omnidirectional diagram; the distance factor 3 (on the X-axis) crosses the curve at approximately -10 dB (read on the Y-axis), meaning the signal of the neighboring microphone is attenuated by 10 dB compared to the signal from the primary microphone. This is an OK distance, as we want the attenuation to be at least 10 dB. This is the 3:1 rule.
Example 2:
If we place multiple supercardioid microphones – two neighboring mics to the primary mic with a distance factor: 4 (the two neighboring microphones are both four times further away from the sound source compared to the primary microphone, for instance 30 cm and 120 cm (1 ft and 4 ft)).
Read the 2NM (red) curve on the supercardioid diagram; the distance factor 4 (on the X-axis) crosses the curve at approximately -14 dB (read on the Y-axis), meaning the signals of the neighboring microphones is attenuated by -14 dB compared to the signal from the primary supercardioid microphone. This is an OK distance, as we want the attenuation to be at least 10 dB.
Panning to the PA
If you work with a Left-Right PA system, one way to enhance the separation between several microphones in front of a choir is by panning. If the purpose is to get highest gain before feedback, it is an advantage to pan every second microphone to one side and vice versa the other microphones. This can provide you with several dB of improvement.
Amplification and induction/hearing loops
Houses of worship, theatres and other venues where people gather, often have an induction loop – also known as a hearing loop – installed. The purpose of this system is to deliver a feed for hearing aid users. The magnetic field is modulated by the sound picked up by choir microphones. The problem is that this magnetic field, can be picked up by dynamic microphones if they do not have a noise coil installed. However, systems with only condenser mics can also have a problem, not because of the microphones, but rather because of the cabling. Often the loop runs in front of the choir stage. Any cables should be kept at a distance to avoid picking up any signal from the loop. If a signal is picked up, the system will feed. And the special thing is, that it may feed even though the loudspeakers are turned down. So, use condensers and keep cables away from any hearing loops.
Choir recording
In recording, you do not have to consider gain before feedback. Instead, it is very much a question of getting the right balance between the singers and the natural acoustics of the venue; interpreting and presenting the spatial information of the space. Sometimes it can be a question of localization, especially with smaller choirs. With large choirs, voices often melt together.
Stereo setup
If the recording is intended for standard two-channel stereo reproduction, a basic setup like AB, XY, ORTF or any other of the near-coincident configurations must be chosen.
Once it is chosen, it is a question of finding the distance between the choir and the microphones. Remember, microphones are not ears, so perform your assessment of the sound (balance between direct and diffuse sound) by using loudspeakers (if the reproduction is intended for loudspeakers). Headphones deliver neither the same perceived spatial impression nor the correct timbral balance.
When the balance between direct sound and diffuse sound is right, the distance and/or the angle between the microphones is calculated based on the width of the choir.
Panned mics
Another way to produce a choir is by placing several spot microphones in the mix with a pan pot. If the choir is very wide, this is often the best solution as the microphones can be distributed evenly in front of the choir. If four choir microphones are used, the far left and far right are panned 100% to either side. The inner mics are just panned in the range of 40-60%.
DPA microphones for choir applications
High definition and clarity is offered by several DPA directional microphones like the 4011 Cardioid Microphone and 2011 Twin Diaphragm Cardioid Microphone mics will help you do this. If you choose the MMP-C Compact Preamp with either of these mics, they are hardly visible, especially when hanged.
The 4098 Supercardioid Ceiling Microphone and 4097 CORE Supercardioid Choir Mic are often preferred for the amplification of choirs. However, both are very suitable for recording as well. The 4097 offers a stand that is the best in its class regarding the reduction of vibrations from the floor.
Another way to produce natural sound with a choir as mentioned is through the broad selection of DPA stereo kits. All kits are carefully matched and are available in sturdy cases with a range of optional accessories. Depending on style and acoustics of your recording room, choose one of the following Stereo Pairs or Stereo Kits:
ST4011A Cardioid Stereo Pair with RSM Accessory Pack
The ST4011A’s ORTF stereo technique is ideal as a spot pair for supporting a choir section of an orchestra. The stereo imaging and spread are superb, and the small recording angle offers good separation.
Tagged Products
ST4006A Omnidirectional Stereo Pair with RSM Accessory Pack
Use A-B stereo to ensure the solo recordings of a choir blend in with the timbre of the recording space. DPA’s omnidirectional microphones offer you the most natural reproduction, capturing true room atmosphere.
3532-SP Stereo Kit consists of two 4041-SP Omni Large Diaphragm Microphones for ultra-low noise, high sensitivity A-B stereo.
Tagged Products
ST4015A Wide Cardioid Stereo Pair with RSM Accessory Pack
References
Bartlett, Bruce: Church Sound: Effective microphone strategies for choirs.
Williams, Michael: Microphone Arrays for Stereo and Multichannel Sound Recording.
Appendix I
Calculation of the loss of signal due to distant positioning:
12 singers, 12 cardioid mics: The reference for the theoretical calculation is a choir of 12 singers, singing equally loud, each with one cardioid microphone positioned on-axis at distance of 5 cm. The choir-output in this situation is referred to as 0 dB.

12 singers, six cardioid mics: Two singers around each cardioid microphone at distance of 30 cm and at an angle of 45°.

| Each singer is now 6 times further away from a mic | -15.6 dB | - from 5 to 30 cm |
| Singers’ angle to the microphone ±45° | -1.4 dB | - less pickup off-axis |
| Two sound sources (singers) per microphone | +3.0 dB | - given they sing equally loud |
| Six microphones instead of 12 | -3.0 dB | - 10*log(6/12) |
| Total | ≈-17.0 dB | - the sum |
Conclusion: We lose 17 dB of the choir signal when using one choir microphone per two singers instead of one per singer.
12 singers, four cardioid mics: Three singers around each cardioid microphone. “Outer singers at an angle of 60° and at a distance of 50 cm. The singer in the middle is on-axis and at a distance of 67 cm.
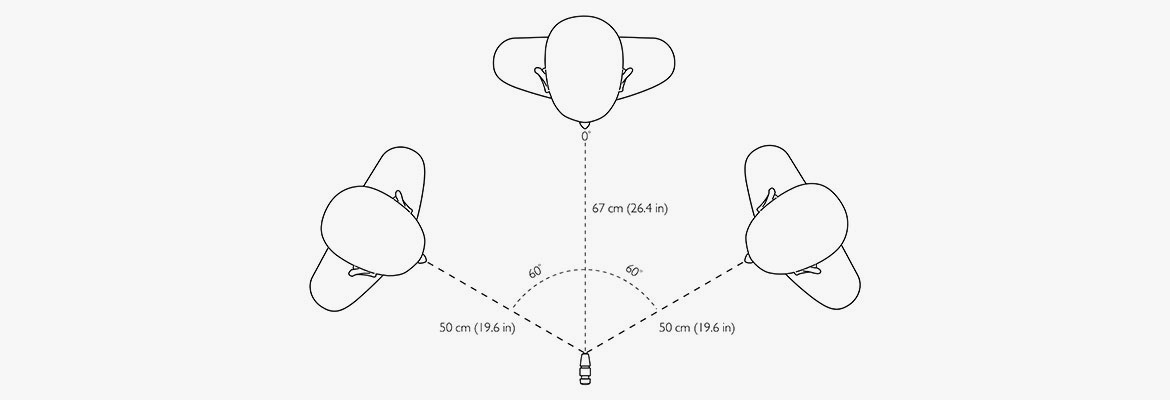
| Two singers are 10 times further away from mic | -20.0 dB | - from 5 to 50 cm |
| Two outer singers’ angle to the microphone 60° | ≈-2.5 dB | - less pickup off-axis |
| Singer in the middle is 67 cm from the microphone | ≈-22.5 dB | - compensating the cardioid |
| Three sound sources (singers) per microphone | +4.8 dB | - given they sing equally loud |
| Six microphones instead of 12 | -4.8 dB | - 10*log(4/12) |
| Total | ≈-22.5 dB | - the sum |
Conclusion: We lose 22.5 dB of the choir-signal when using one microphone per three singers instead of one per singer.
Twelve singers, three cardioid mics: Four singers around each cardioid microphone. Outer singers at an angle of ±75°and at a distance of 60 cm. The singers in the middle are at ±45°and at a distance of 75 cm.

| Two outer singers, 12 times further away from the mic | -21.5 dB | - from 5 to 60 cm |
| Two outer singers’ angle to the microphone 77° | ≈-4.0 dB | - less pickup off-axis |
| Two singers are 16 times further away from the mic | ≈-24.0 dB | - from 5 to 80 cm |
| Two inner singers’ angle to the microphone 45° | ≈-1.5 dB | - less pickup off-axis |
| Four sound sources (singers) per microphone | +6.0 dB | - given they sing equally loud |
| Three microphones instead of 12 | -6.0 dB | - 10*log(3/12) |
| Total | ≈-25.5 dB | - the sum |
Conclusion: We lose 25.5 dB of the choir-signal when using one choir microphone per four singers instead of one per singer.
Twelve singers, two cardioid mics: Six singers around each cardioid microphone.
The outer singers are at an angle of ±90° and at a distance of 50 cm.
The next two singers are at an angle of ±60° and at a distance of 75 cm.
The inner two singers are at ±30° and at a distance of 93 cm from the microphone.

| Two singers, 10 times further away from the mic Singers at ±90° Two singers summed Total level, two singers |
-20.0 dB -6.0 dB +3.0 dB -23.0 dB |
- from 5 to 50 cm - microphone attenuation - summation of uncorrelated sources |
| Two singers, 15 times further away from the mic Singers at ±60° Two singers summed Total level, two singers |
≈-23.5 dB -2.5 dB +3.0 dB -23.0 dB |
- from 5 to 75 cm - microphone attenuation - summation of uncorrelated sources |
| Two singers, 18.6 times further away from the mic Singers at ±90° Two singers summed Total level, two singers |
≈-20.0 dB -6.0 dB +3.0 dB -23.0 dB |
- from 5 to 93 cm - microphone attenuation - summation of uncorrelated sources |
| Adding three pairs of singers | +4.8 dB | |
| Total level, all singers | -18.2 dB |
Conclusion: We lose ≈18 dB of the choir-signal when using one choir microphone per six singers instead of one per singer. Please notice that the frontline singers are closer to each other compared to the next two singers due to the microphone’s attenuation at 90°.