How to mic a harp
Guidelines for miking the harp.

The harp, like the grand piano, is a challenging instrument to record. Its sound field is complex and can only truthfully be picked up if you are at least 2 to 3 meters away from the instrument. Although the harp's stereo distribution is vertical rather than horizontal, it is desirable to pick up the stereo-like aspects of the sound field around the instrument, including room reflections, as we would normally listen to it from a certain distance.
In many cases, pedal harps and smaller (or Celtic) harps have been recorded with an unreflected point-and-shoot microphone position, which results in the subjective urge to apply compression, equalization, and plenty of reverb to get to an agreeable sound. While this may be applicable to various music styles, the harp can successfully be recorded without having to resort to electronic countermeasures. Let's simply take some time to experiment with microphone positions and the relation between instrument and recording room.
This article focuses on how to achieve a natural sound when recording the harp, like it is perceived in the front row when visiting a concert. Three basic applications for harp pickup will be described, namely solo recording, spot miking in an ensemble or orchestra, and stage sound.
Harp solo recording
As described above, the harp and the room form an inseparable entity. This is best captured with omnidirectional microphones. Like with piano and other full-scale instruments, the best results can be expected from using an A-B stereo setup, with or without a baffle disc between the microphones.
It is generally challenging to find a room that fits both the instrument and the chosen music. Generally, a studio environment without a big enough room may not lead to a satisfactory tonal balance. The harp – just like the grand piano – needs a room in which it can unfold its sound.
Once a location has been chosen, the next step is to find a sweet spot for the harp in that room; the best approach is to try out extreme positions and to close in on the more amiable places in relation to the room. It is often found that the harp fits well between a corner and the center of the room, not too close to either of them, while the microphones are placed closer to the center of the room, and not too low to avoid floor reflections. A high ceiling with broken lines that provide some diffraction, such as in a church, is desirable.
When miking the harp, we follow the basic rule that the placement should be at least as far from the instrument as the instrument is big, so for a full sized pedal harp with its 190 cm height, a distance of about 200 cm is recommended as minimum distance. This way, the various components can mix into the complete harp sound while they travel in the air between instrument and microphones.
Move the microphones closer to, or further away from the instrument to find the position that represents the best mix of detailed instrument sound and room response.
A spot microphone closer to the harp can be added to the main stereo pair to provide more direct sound and detail. Be careful about two potential issues here, namely too much unwanted noise from the pedals or the player's fingers hitting and damping the strings, and secondly picking up only one component of the harp's sound while omitting another.
Needless to say, our stereo array can also accommodate more instruments, such as a harp & flute duo. A baffle disc between the microphone pair will be of considerable help in achieving a natural sounding stereo image.
Harp spot microphones
When an ensemble or orchestra is already picked up by a main stereo pair, the different sections are often backed up with spot microphones. The more isolation from other sound sources is desired, the more directional the microphone should be.
Tagged Products
In the case of the harp, the spot microphone, such as the 4011 Cardioid Microphone, should – again – not be placed too close to the instrument. A workable starting point is the area around the top of the harp's pillar, with the microphone pointing down towards the sound board. The microphone should be moved further away from the harp, if there is enough space available.
This placement will bring out the higher frequency aspects of the harp without sounding boomy. As a side effect, it will often transport the harp slightly to the foreground of the orchestral sound image. If this effect is not desired, a different position can be tried: slightly behind the harp, pointing downwards from the right – essentially opposite the player's head, just a little higher.
Using another spot microphone for the higher strings is helpful, but could potentially distract the player. Good results have been reported by using compact cardioid microphones. One from right behind the harp, facing the sound board from about 30 cm distance, the other looking at the sound board horizontally, from about the same distance. The two are then mixed with the top microphone twice as loud as the lower one. As a side note, the two microphones need not be panned to the left and right channel, as the harp has very little horizontal stereo image.
A common placement is to put one microphone – often with a cardioid pickup pattern – right in front of the harp, directly looking onto the sound board. Unfortunately, the resulting sound represents only a fraction of the complete instrument and often sounds boomy, with a peak in the bass or the low mids. A directional microphone will enhance the boomy low end if placed too closely, therefore great care should be taken to avoid this effect.
Harp stage sound
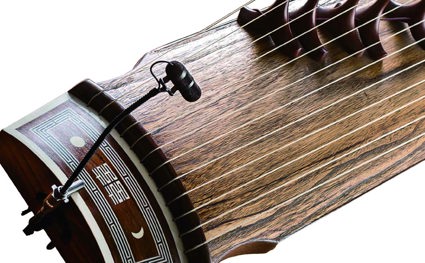
For live applications, such as amplifying a harp on stage, yet another approach is required. Sometimes cosmetic considerations are important when the stage setup does not go together with visible microphone arrays and the like. This is a very useful application for miniature microphones such as the omnidirectional 4060 Miniature Microphone. They can be concealed within one of the harp's sound holes, which usually yields satisfactory results with a relatively natural sound. As a first approximation, try the second sound hole from the bottom, and optionally cover one or two of the lower sound holes with pieces of foam.
Alternatively, or additionally, a small microphone can be placed on top of the harp's pillar, similar to the spot microphone position described above. However, there will be more bleed from other sound sources than with the previous method.
Theoretically, the microphone could be placed near the sound board, but firstly, the resulting sound would emphasise the neighboring strings too much, and secondly, the microphone would inadvertently act as a boundary layer microphone, picking up too much unwanted sound – however pristine – from the stage environment.
Miking a harp: further considerations
One challenge with pedal harps is their tendency to sound boomy, especially in smaller rooms. This is due to the fact that they were designed to compete with a large orchestra, and therefore feature a rather strong base tone, often with very little harmonic content compared to other instruments. What makes matters worse is the fact that there will always be resonances in the lower strings, some of them more pleasant to the ear than others. To counteract this effect, the sound holes of the harp can be partly stuffed with pieces of foam, which is a popular technique to tame the aggressive peaks in the low mids, around 180 Hz. The use of omnidirectional microphones that do not display any proximity effect is recommended, especially when picking up the harp from a closer distance.
Generally, the harp is very sensitive to microphone positioning, and we are trying to evade the disturbing aspects of the harp sound, such as pedal action noise or disharmonic ringing of the bass strings. Instead, we want to bring across the more pleasant ones, such as a bright attack, a well-pitched dosage of harmonic resonances, and an overall balance of the 47 strings which span almost seven octaves. It is essential to use microphones that can handle this task without distortion or coloring, and to take time for finding the sweet spots in a given recording situation.
There are some general statements such as "close miking for jazz, distant miking for classical music," which should always be taken with a grain of salt; a particular classical music piece may call for a straight response without sounding too spacious, and a piece written in a modern style may need exactly that spaciousness to sound right. The engineer should always feel some artistic freedom to make the overall sound work together with a style, a situation, or an album's theme that is reflected in different microphone positioning and balance.
Additional note
With the clip original intended for guitar, the 4099G Instrument Microphone can also be used on a live stage or for demanding isolation.